With the gas tank finally hung under the driver side chassis, and the fill point fitted to the column behind the drivers door, the next job was to connect everything up.
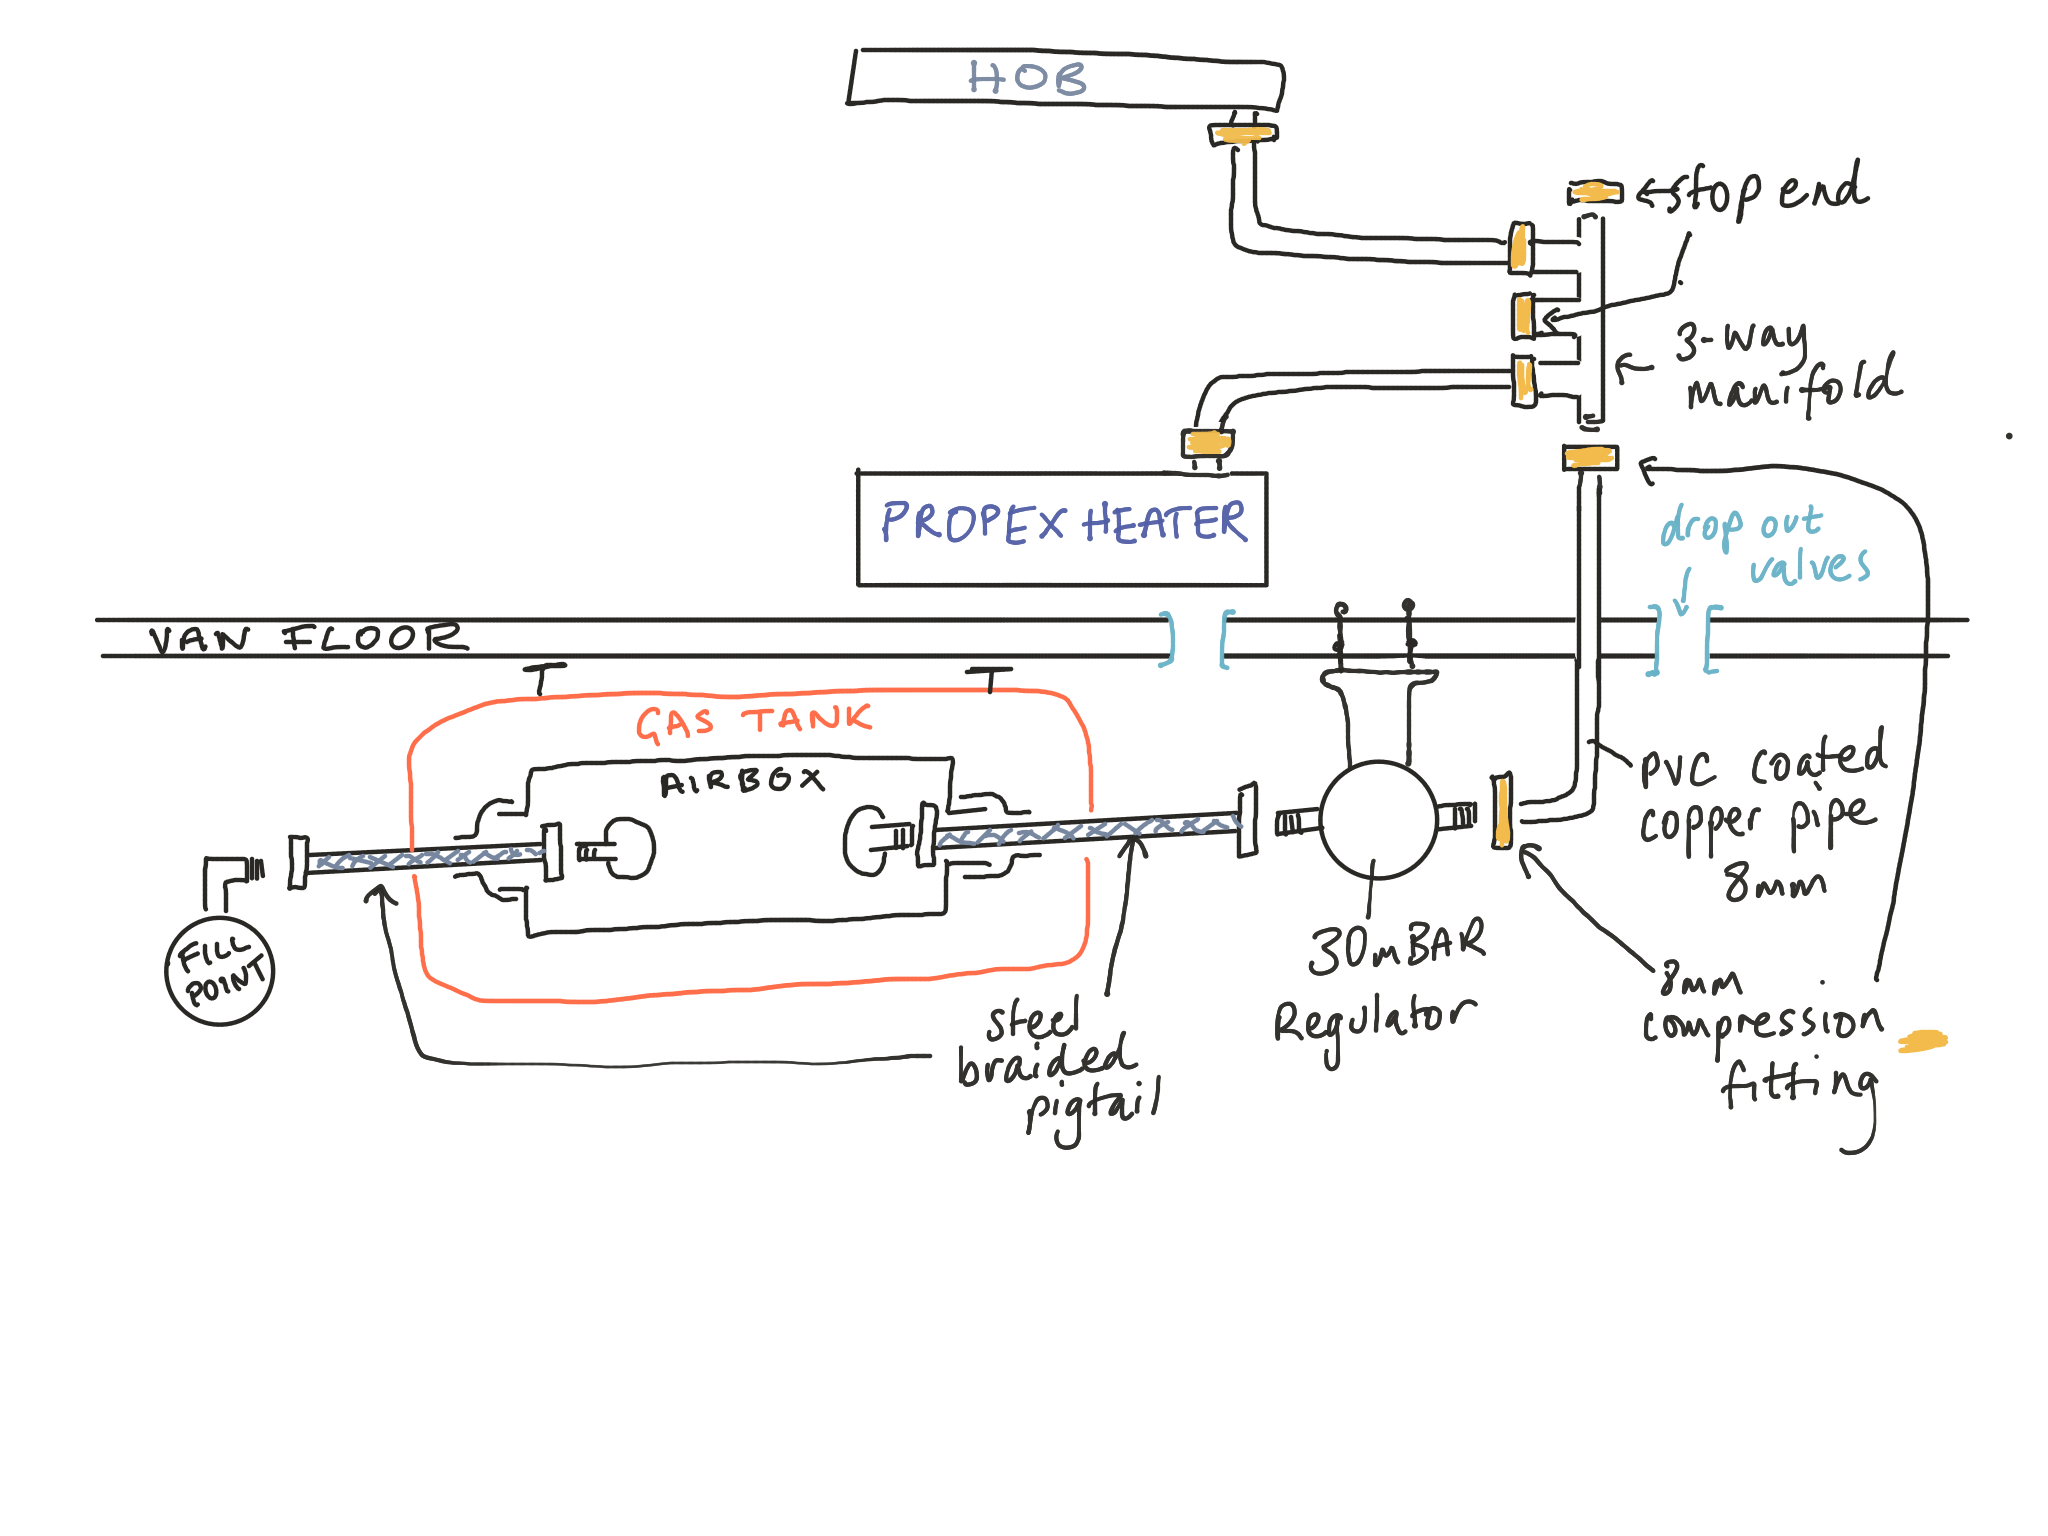
Here’s the layout:
We originally bought a filter that is supposed to go between the gas tank and the regulator. It screws directly to the tank ‘out’ valve in the air box on the LPG tank. The idea is that it catches oil/ water vapour/ crud in the tank? (Gasit were extremely vague about this) and when I finally called them because I couldn’t actually fit this filter to the tank because of the exit points from the air box are so tight around it that I wouldn’t be able to tighten the joints, plus there was no way of supporting it and it’s quite heavy so would jiggle around a LOT he implied that it was a bit unnecessary anyway so I sent it back.
Fill point to tank
Connecting the fill point to the tank was straight forwards. This is a steel braid coated pigtail with female ends.
Tank to regulator
The tank outlet is connected to the regulator which is bolted to the bottom of the van floor. This is also via steel braided pigtail.
Regulator to manifold
From the 8mm compression fitting of the regulator, a PVC coated copper pipe (8mm) is run through a hole in the floor to a manifold which is supposed to be in an accessible place inside the van. Each appliance can be isolated here if there are any problems. We got a 3-way manifold (about £22 from Rainbow conversions) in case we get a water heater in the future. For now the third outlet is blanked off.
Here is an ‘under the van picture’

Drop out valves
There also needs to be a drop-out valve (gas is heavier than air so it sinks down and out of the hole in the floor) in case of a leak. We put one in the cupboard where the heater and hob are, and another where the manifold is.
The hole I drilled for the drop out valves wasn’t quite big enough and the two parts of the valve don’t fit together all the way through the floor so it sticks out at the bottom. I sealed around these holes and the hole for the copper pipe with silicone.
The hob
This is from Dometic. It has 2 burners and a glass lid. We have now used this for a couple of months.
Pros:
- Seems to work well.
- The big burner is enough to get a 24cm frying pan really hot.
- The small burner turns low enough for a gentle simmer.
- The pot supports are sturdy, and can be removed for cleaning (although one little rubber bungs that holds the feet of the pot support in has already come out and so doesn’t support the pot stand fully. And would leak if there was an over boiling pot).
- It was relatively easy to fit although it didn’t come with a template for cutting the hole in the work surface.
- When the lid is down, it provides extra worktop space.
Cons:
- The glass lid feels horrible and is noisy- I would like to replace it with a nicer material.
- It is really fiddly to clean and the knobs are tucked away in a dip which collects crud and grease.
Propex heater
This is the 2000 HS model with 1 outlet for heated air.
It comes with a handy template because you have to drill holes in the floor of the van. One hole for the air inlet to the combustion chamber and another for the flue for the combustion products. This means that unlike a lot of gas heaters (or using your gas hob to heat the van), the water produced by burning the gas ends up outside so reducing condensation.
Air from inside your van is taken in to the heater by vents in the cupboard that you put the heater in and is circulated by a fan over the heater and then blown out back into your living space via a big cardboard tube via another vent (swivelling) in your cupboard. These vents and this process is completely separate from the combustion part of the heater
The heater itself is also screwed to the floor.
Here is a picture of our heater before we built the cupboard around it.

It also needs a power source and then the thermostat and control knob are connected via a fairly long cable so you have a bit of flexibility where you can mount the thermostat.
So all in all the heater is a palaver to fit- you need to consider many things:
- The position of the cupboard or floor space it is in because of the vents through the floor and where they emerge under the chassis.
- The passage of the gas pipe (8mm) from the manifold.
- The power cables from the fuse box cannot be too long (to avoid a voltage drop)
- The position of the thermostat and the cable that runs to it. (Please Propex, make a wireless model)
- Lastly, the air intake via vents in the cupboard must be accessible and not easily blocked by furniture or clothing etc and the same goes for the air outlet vents. In our case we had practically no space for the cardboard tube before it reached the vent so it is only about 10cm long.
We’ve used it for a couple of trips now, and while I would not be without a heater, there are a few things we don’t like about this one.
Pros:
- It seems to be reliable (so far we’ve used it for a couple of months).
- It seems to be sturdy and well made.
- The Propex engineers are extremely helpful and friendly.
- The fitting instructions are good and clear.
- The cables and tubes are reasonably generous.
- You can direct where the hot air goes by swivelling the vent.
Cons:
- It is pretty noisy – much louder than we expected – like a domestic fan heater or a bathroom extractor, but it’s in a much smaller space.
- The fan runs for about 20 seconds before the heater kicks in and for a minute or so after it has switched off.
- The thermostat seems somewhat insensitive. We have only heated the van up once enough to trigger the thermostat to switch off, and because its so loud we would rather control when it kicks in ourselves, so generally it is switched off until we need it.
- The thermostat is a big ugly plastic box with horrible ugly knobs.

Leave a comment